How To Add Additional Ip Address To My Cisco Pix Firewall
This Page Contains information about How To Add Additional Ip Address To My Cisco Pix Firewall By wallpaperama in category Tutorial And Guides with 0 Replies. [1487], Last Updated: Sat May 18, 2024
wallpaperama
Fri Jan 09, 2009
0 Comments
757 Visits
today i will show you how you can add an additional ip address to your cisco pix firewall.
for example, i am using NAT:
My Public Ip: 208.18.255.94
My Private Ip: 10.0.0.1
first start by login into your firewall, we are going add our public ip
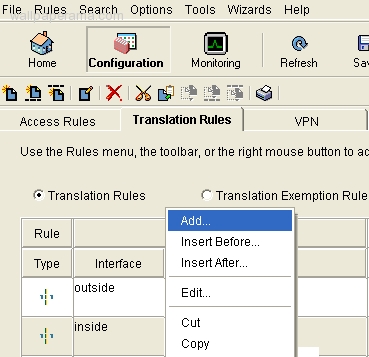
- then click on the Configuration Icon at the top
- the click on the "translation Rules" tab
- Select "Translation Rules" radio button
- right click and select add

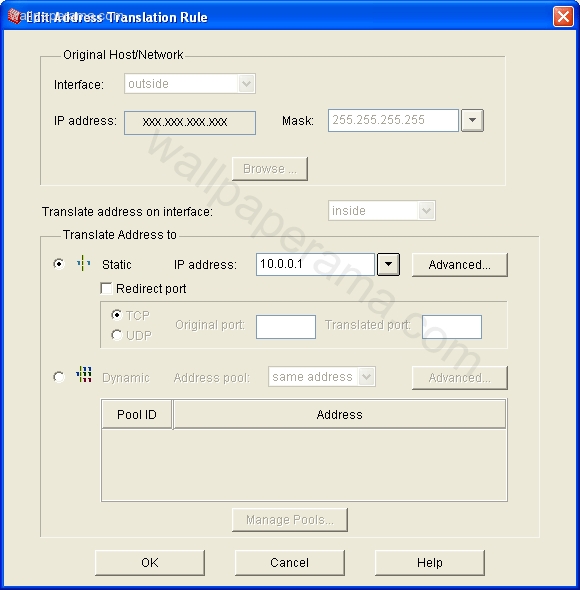
now populate the following fieds:

- Interface: Outside
- Ip Address: 208.18.255.94
- Mask: 255.255.255.255
- Static
- Ip Address: 10.0.01
- TCP
- After you have populated each field click on OK
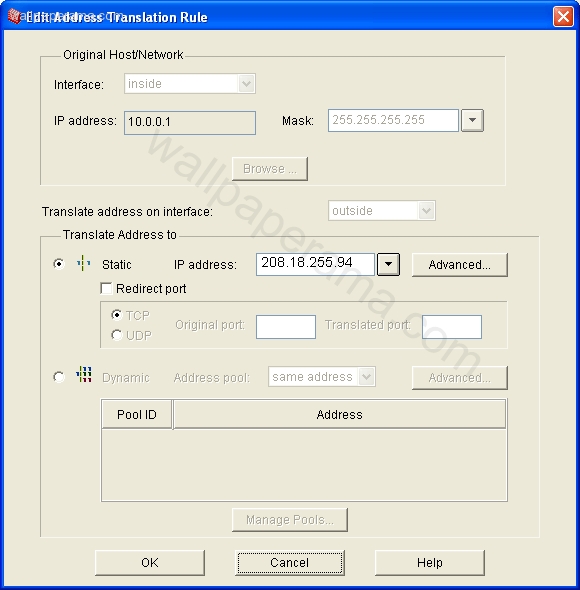
now we are going to add our private ip, so bascially is the same exept instead of external its going ot be internal

- Interface: Inside
- Ip Address: 10.0.01
- Mask: 255.255.255.255
- Static
- Ip Address: 208.18.255.94
- TCP
Click OK
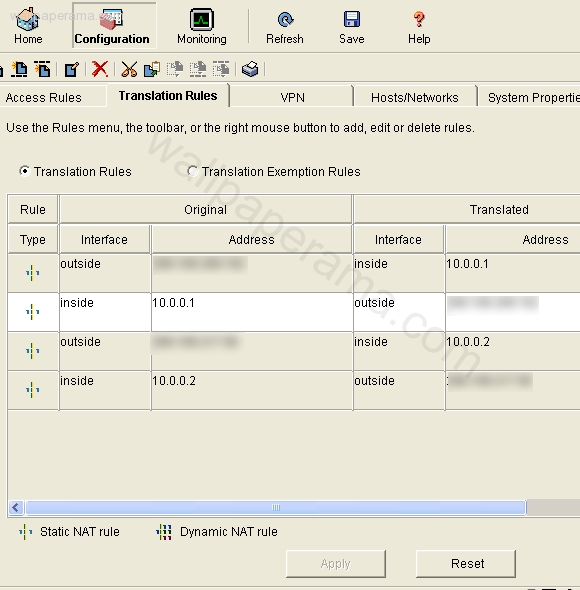
now after you have added the two, click the APPLY buton at the bottom and it will add the new changes, at the end you should have your two in and out interfaces like mine here. i blurred out my ips for security, but just to show you the final

now you have to bind the new ip in your server, to do that follow this tutorial here:
http://www.wallpaperama.com/forums/how-to-add-virtual-ip-address-to-linux-t6967.html
for example, i am using NAT:
My Public Ip: 208.18.255.94
My Private Ip: 10.0.0.1
first start by login into your firewall, we are going add our public ip
- then click on the Configuration Icon at the top
- the click on the "translation Rules" tab
- Select "Translation Rules" radio button
- right click and select add

now populate the following fieds:

- Interface: Outside
- Ip Address: 208.18.255.94
- Mask: 255.255.255.255
- Static
- Ip Address: 10.0.01
- TCP
- After you have populated each field click on OK
now we are going to add our private ip, so bascially is the same exept instead of external its going ot be internal

- Interface: Inside
- Ip Address: 10.0.01
- Mask: 255.255.255.255
- Static
- Ip Address: 208.18.255.94
- TCP
Click OK
now after you have added the two, click the APPLY buton at the bottom and it will add the new changes, at the end you should have your two in and out interfaces like mine here. i blurred out my ips for security, but just to show you the final

now you have to bind the new ip in your server, to do that follow this tutorial here:
http://www.wallpaperama.com/forums/how-to-add-virtual-ip-address-to-linux-t6967.html